Swap-bot Time: January 18, 2025 10:18 am
www.swap-bot.com

FF: No Sew Me a Fabric Star...International

Launch gallery slideshow
FF: No Sew Me a Fabric Star...International
Group:Fabric Fanatics
Swap Coordinator:LittleRed (contact)
Swap categories: Seasonal 
Number of people in swap:10
Location:International
Type:Type 3: Package or craft
Last day to signup/drop:November 15, 2013
Date items must be sent by:November 29, 2013
Number of swap partners:1
Description:

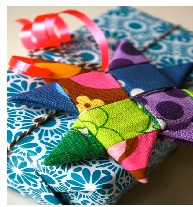
Have a look at his simple and adorable project to make a fabric star tree ornament. Link Here
Make one star ornament ready to hang (with ribbon or thread attached) for your partner and send it off in a nice Christmas card. It is a good opportunity to use up some skinny scraps...All you need is 4 scraps in some nice colours...that are 8cmX 30cm...or...3inch X 12 inch. The instructions are in photos and are easy to follow....Check it out. In the tutorial she used a hole punch to make it easier to thread through the hanging ribbon.

Send one ornament following the pattern in the link above in a Christmas card (signed and written in) to your partner......and you will receive a lovely ornament from your partner to add to your tree this year.

As pointed out by @craftycrocheter ....some further instruction might be helpful. Essentially we are making the flat component of the German Star ornament...There is a great video HERE for anyone wanting more instruction. You will only need the portion shown in video part 1 although....part two is great if you want to make the full blown paper ornament.

Discussion

Mugsie 11/ 7/2013 #

I love that star! Never seen anything like it!

earthnk 11/14/2013 #

Ditto live here. Any idea what size the finished star is?

craftycrocheter 11/14/2013 #

I made one to give it a try. Here are also some things I found as I did it, that may help you out when you make yours-

@earthnk the star I finshed is 8.5 cm or about 31/4 inches-from point to point.

After you get the 4 pieces linked together, you have to flip the piece over, (first picture-green on top, blue on bottom, next picture- blue on top, green on bottom) but if you don't look for it you can miss it.

The next picture shows the purple fabric hooked into the blue fabric, but it doesn't show that you do it with all 4 pieces, basically weaving them over and under, to hook them together.

Then you make the points, you will need to twist the star around as you go, to do four points on one side, then flip it over to the other four points on the other side.

Also you need to try and keep the pieces as tight together as possible, so when you get done the star won't fall apart.

I also think maybe a little fray check on the edges after you clip the ends off wouldn't hurt, that way they won't tend to fray out. Maybe even a little dab of glue to hold it all together, especially if you don't get the pieces real tight.

And last but not least a pair of tweezers might help to pull the pieces together, especially when you get to the ends.

LittleRed 11/14/2013 #

For anyone having Difficulty following the instructions in the link....Have a look at this video....It is much easier making them in paper and the video will show more detail. You will only need to watch the PART 1 video as we will not be making them 3 dimensional. Although, If you are hooked and want to make 3 dimensional paper ones for gifts...they are lovely little gifts:) HAVE A LOOK AT THE VIDEO HERE

Mugsie 11/14/2013 #

I have to practice it once or twice. Sure hope you do this swap again. I will definitely join!!

anrtist 11/26/2013 #

It really helped to watch the video and work along with it! I also made a paper star first (Used it as a charm on an Illustrated Dictionary Letter Swap!;-)... then the fabric. Fabric was much harder/bulkier....but pretty! Must make some more for my tree!

Leave a Comment

You must be logged in to leave a comment. Click here to log in.

I received the item
I sent the item

Received from:
For multiple members, separate names with spaces

Description: